The Arduino is an open-source microcontroller board it is developed by Arduino.cc. Arduino is defined as a complete development platform (hardware and software) based on a Microcontroller and intended to be used in Physical Computing applications, its hardware is based on a simple electronic board with analog and digital inputs and outputs for the connection of various sensors and actuators, also its software is based on Integrated Development Environment (IDE) which is very similar to the C programming language in structure and syntax. In simple terms, the Arduino platform is a small computer system that can be programmed with instructions to interact with your physical environment through various forms of inputs and outputs. The board is equipped with sets of digital and analog input/output (I/O) pins that may be interfaced with various expansion boards (shields) and other circuits.
Arduino system is the union of Hardware and Software, which allows the development of Physical Computing applications, Arduino hardware is made up of its electronic boards or cards based on the ATMEGA Microcontroller, and they include a USB interface for downloading firmware as well as terminals that make the input /output pins of the internal Microcontroller available to the card. The Arduino board models are varied in the number of inputs/outputs, but all respond to the same programming language.
Comparison of Popular Arduino Boards
ARDUINO IDE
The other component of the Arduino system is the IDE or software that allows you to program the Arduino board, this IDE is an Integrated Development Environment where you can edit, compile and program the firmware of the Arduino application, the programming language is the C language / C ++.
Programming the Arduino platform is simple, it simply requires a little knowledge of the structured language, the use of libraries and objects, and for those with little experience in programming in structured languages, it will be very easy to develop programs for Arduino.An advantage of the Arduino system is that its IDE is downloadable completely free, www.arduino.cc , also because it is a platform developed under the Open Source Hardware philosophy, there is a large knowledge base on the use of the IDE and examples of programs application for Arduino.The Arduino IDE interface and the program is developed using the Processing language, hence its enormous similarity to it, the IDE has all the necessary tools to encode, compile and download our programs to the Microcontroller’s memory inside the Arduino card, the files source code created by the IDE has the extension .ino and are called sketches.
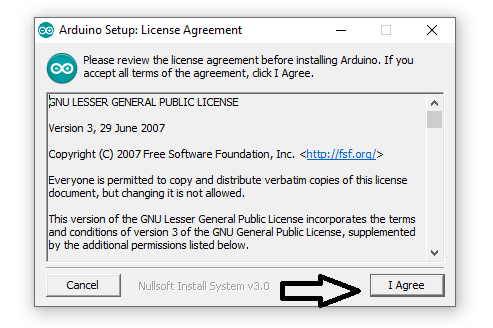
2) After download, double click on the setup file and accept the license agreement by clicking on I agree.
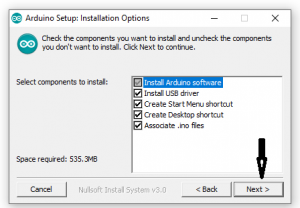
3) Then tap on the Next button. Make sure that all components are selected
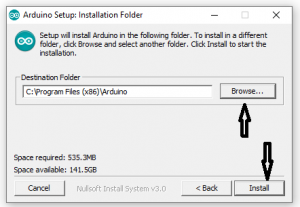
4) Select the destination folder to which setup will be installed. Then click install
Arduino IDE Overview
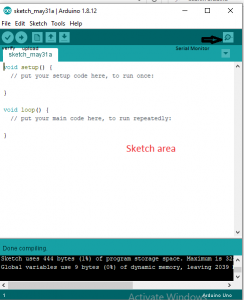
Once installed it can be noted that in the upper part of the IDE there are 6 main buttons, below is the description of how each button works, from left to right
Verify: Verify that the code entered is correct and compile it, in case of error it indicates the line where it occurred.
Upload: Compile the program and upload it to the Arduino board.
New: Create a new sketch.
Open: Open an existing sketch
Save: Save the current sketch.
Serial Monitor: It shows a serial terminal, this tool will be useful to communicate with the Arduino from the PC, it is commonly used as a debug console.
Below the buttons are the code area, where the program is written and edited, automatically colors the words reserved by the compiler
At the bottom is the command console, that’s where errors and progress of the board’s compilation and programming process will be reported; lower down on the left side it indicates the line number where the cursor is located and on the right side it indicates the version of the connected board and the serial port to use.
Learning Arduino Programming - Blinking LED
A typical program in the Arduino programming language is made up of sentences or statements written using instructions in the Arduino C language. For this example, we will be using Arduino UNO board.
Features of Arduino UNO
ATmega 328 Microcontroller
Operating Voltage 5V
Input Voltage 7-12 V
Number of Digital I / O Pins 14 (D0-D14)
Number of Analog Inputs 6 (A0-A5)
Output Current per pin 40 mA
FLASH Memory 32 KB
SRAM 2 KB
EEPROM 1 KB
Clock Speed 16 MHz
PIN D0 and D1 supports Serial reception and transmission
PIN D3, D5, D6, D9, D10, D11 which indicated by a tilde symbol also supports PWM (Pulse WidthModulation)
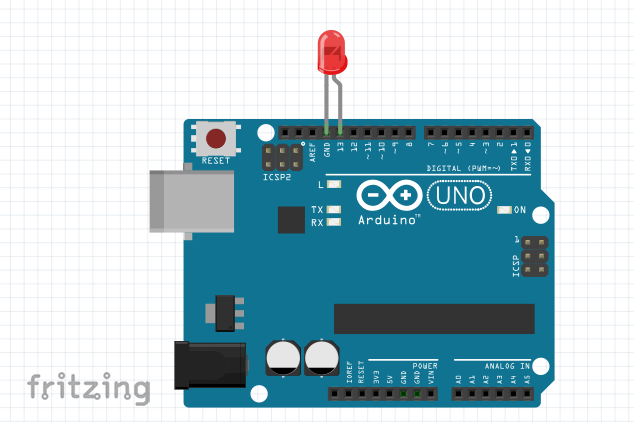
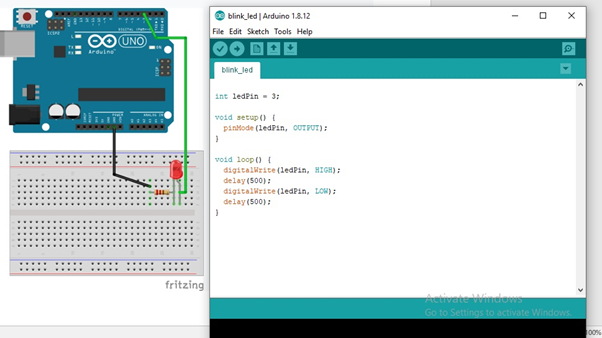
The above circuit diagram is made using Fritzing. Fritzing software enables designers, artists, researchers, and hobbyists to document their Arduino-based prototypes and create printed circuit diagrams for later manufacture.
The LED is connected to digital pin 13 of Arduino UNO. Since PIN 13 is having an in-built resistor, we don’t have to connect an external current limiting resistor.
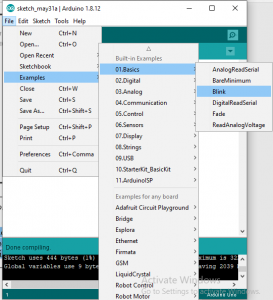
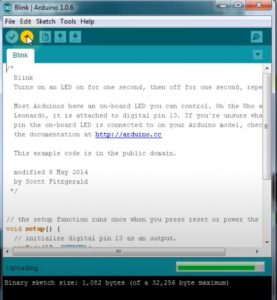
For programming LED , go to File- Examples-Basics-Blink as shown below.
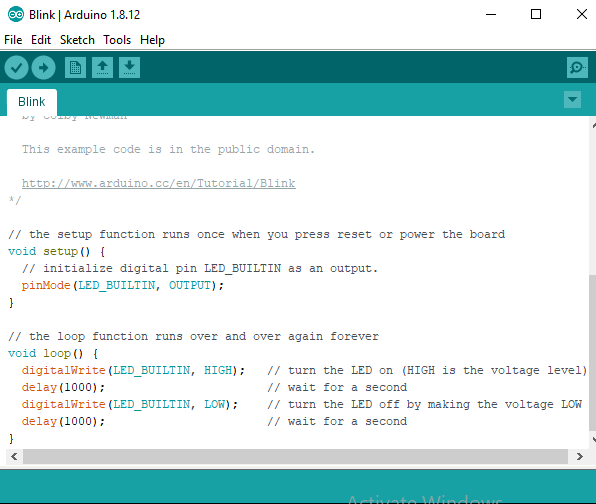
You will get a screen like below
Inside the main program, there are two blocks namely void setup () and void loop () statement. One that will only be executed once when starting the program and another part in which an infinite loop will be generated.
The void setup () is usually used to initiate serial, i2c, isp, etc. communications, to declare the function of the terminals of the Arduino board: inputs or outputs, and also this instructions block can be used to assign predefined values to variables.
The infinite loop which is found from void loop () encompasses the program that will run on the microcontroller of the Arduino board.
We can also see that each group of blocks is between 2 braces that delimit them, that each sentence ends with a semicolon and that comments can be added to the program without affecting it by adding 2 sidebars.The LED_BUILTIN indicates PIN 13. Inside the void loop () the LED will be switched ON and Switched OFF with a delay of 1 second using instruction digitalWrite(pin_number, HIGH) and digitalWrite(pin_number, LOW).
How to upload program code to Arduino board
1) Connect the Arduino USB port to Laptop/PC with USB cable type A/B as shown below
2) Then click on Tools – Board and select Arduino UNO
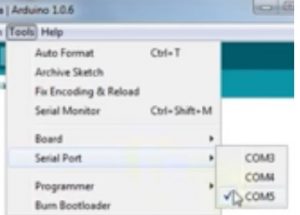
3) Then tap on Tools – Serial Port and select the port assigned for connected Arduino
4) Then click on upload button to burn the code into Arduino board
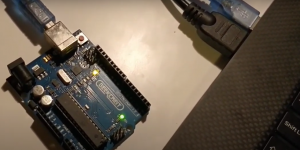
5) After successful uploading of code, the LED will start blinking
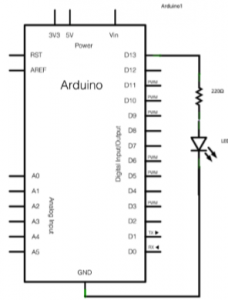
You can also connect LED to other pins from D0-D12, but make sure that you are using an external resistor. The resistor value can be 330 ohm to 1Kohm.
As the LED is connected to digital pin 3, we have to mention that in sketch. After successful uploading of program, the LED will blink.