LCD (Liquid Crystal Display) is a type of display that uses liquid crystals for its operation. A 16×2 LCD means there are 16 columns and 2 rows. Therefore a maximum of 32 characters can be displayed at a time. All characters are displayed in a 5×7 pixel matrix format in 16X2 LCD. Other Various configurations include (1 line by 20 X char up to 8 lines X 80). This LCD has two registers, namely, Command and Data. The command instructions given to the LCD are stored in the command register. For performing various tasks like LCD initialization, clearing the display, assigning cursor positions, text display location, etc., various commands are given to LCD in hexadecimal format. The data register is used to display data on LCD. The data is the ASCII value of the character to be displayed on the LCD.
In this tutorial, we will learn how to connect the Liquid Crystal Display or LCD to the Arduino board using Tinkercad software. LCD nowadays is very popular and broadly used in electronic projects as they’re good for displaying information like sensors data from your circuit and also there are very cheap.
If you are new to Arduino you can refer to the below link :
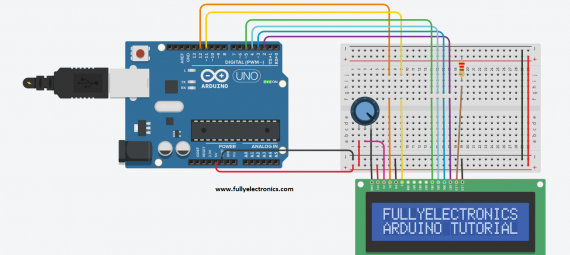
*LCD RS pin to Arduino digital pin 12 * LCD Enable pin to Arduino digital pin 11 * LCD D4 pin to Arduino digital pin 5 * LCD D5 pin to Arduino digital pin 4 * LCD D6 pin to Arduino digital pin 3 * LCD D7 pin to Arduino digital pin 2 * LCD R/W pin to Arduino ground * LCD VSS pin to Arduino ground * LCD VCC pin to Arduino 5V * 10K resistor: * ends to +5V and ground * Pot middle pin to LCD pin VEE (pin 3).
Arduino Code
/* The circuit: * LCD RS pin to digital pin 12 * LCD Enable pin to digital pin 11 * LCD D4 pin to digital pin 5 * LCD D5 pin to digital pin 4 * LCD D6 pin to digital pin 3 * LCD D7 pin to digital pin 2 * LCD R/W pin to ground * LCD VSS pin to ground * LCD VCC pin to 5V * 10K resistor: * ends to +5V and ground * Pot middle pin to LCD VEE pin (pin 3)
*/
// include the library code: #include
// initialize the library with the numbers of the interface pins LiquidCrystal lcd(12, 11, 5, 4, 3, 2);
void setup() { // set up the LCD’s number of columns and rows: lcd.begin(16, 2); // Print a message to the LCD. lcd.print(“FULLYELECTRONICS”); }
void loop() { // set the cursor to column 0, line 1 // (note: line 1 is the second row, since counting begins with 0): lcd.setCursor(0, 1); // print the number of seconds since reset: lcd.print(“ARDUINO TUTORIAL”); }